
How Do You Turn a Photo of a Broken Part Into a 3D Print With ChatGPT?
Disclosure: this page contains Amazon affiliate links. As an Amazon Associate we earn from qualifying purchases, at no extra cost to you.
Oh, this one gets me right in the fix-it heart, broken-part rescuer! Say the little plastic latch on your vacuum just snapped, and the maker stopped selling it years ago. The whole machine still works, except for one tiny piece nobody will sell you. That’s a maddening spot to be in, and it’s exactly where ChatGPT and a 3D printer can help. Start with a pair of digital calipers (Amazon search), because your measurements matter far more than your photo.
Short answer: Measure the broken part with calipers, then give ChatGPT your photo and those measurements and ask for an OpenSCAD script. Preview it in OpenSCAD, export an STL, slice it, and print a small test piece. Fix the fit, then print the real part in a plastic that suits the job.
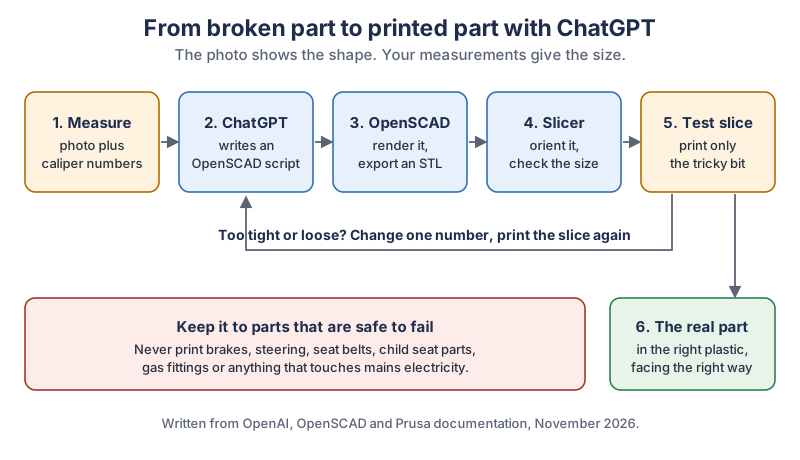
The same steps in plain text:
- Measure. Take photos and real caliper numbers.
- ChatGPT. It writes an OpenSCAD script from your numbers.
- OpenSCAD. You render the script and export an STL file.
- Slicer. You orient the model and check its size.
- Test slice. You print only the tricky bit. If it’s too tight or too loose, change one number and print the slice again.
- The real part. You print it in the right plastic, facing the right way.
Keep this to parts that are safe to fail. Never print brakes, steering, seat belts, child seat parts, gas fittings or anything that touches mains electricity.
Can ChatGPT really turn a photo into a 3D model?
ChatGPT can read a photo and write code that builds a 3D model, but OpenAI doesn’t document a photo-to-STL feature. We searched OpenAI’s full ChatGPT and Codex documentation on November 6, 2026, and it never mentions STL, CAD, OpenSCAD or Blender.
Here’s what OpenAI’s docs do describe:
- Reading images. OpenAI’s image inputs page says you can attach an image and tell ChatGPT what to inspect, and adds this:
don’t rely on the image alone to communicate the task.
That line matters here. A photo shows a shape, but it can’t tell ChatGPT that a slot is 6.2 mm wide. - Making files. OpenAI’s page on working with files names documents, presentations, spreadsheets and PDF files. 3D formats aren’t on the list.
- Making pictures. ChatGPT’s image generation creates and edits images. A picture of a part isn’t a model you can print.
Some people do get STL files straight from a chat. One user on OpenAI’s community forum wrote in July 2026 that they use it all the time for 3D printing
but that a decent file takes forever. So an STL from the chat is possible, just not a feature you can count on. A script is the sturdier route, and it’s the one this guide uses.
Does GPT-6 or Astra add a CAD feature?
OpenAI’s docs name no CAD feature for GPT-6 or GPT-6 Astra. The models page describes Astra as the fit for the most demanding work and Luna as the fit for focused, repeatable tasks. OpenAI’s GPT-6 announcement puts Free and Go on GPT-6 Luna, and Plus, Pro, Business and Enterprise on GPT-6 Sol. A stronger model may write a better script, but none of them can feel a tight fit. Your calipers and your test print still decide that.
Do you need a paid ChatGPT plan to do this?
The script route should work on the Free plan, as long as you stay inside its limits. OpenAI’s upload help page lists image uploads on Free and paid plans, with a limit of 20 MB per image, and says Free users are limited to 3 file uploads per day. Pick your best photos. OpenSCAD and PrusaSlicer are both free downloads.
Should you look for an existing part before you model one?
Yes, because someone may have already solved your exact problem. Spend ten minutes searching before you measure anything.
- Find the part number. It’s often molded into the plastic. Check the maker’s spare parts page for it.
- Search free model libraries. Prusa says Printables hosts over 2 million free models. OpenSCAD’s site also points to Printables, Thingiverse and MakerWorld.
- Search by appliance model. Try the model number plus the word for the piece, such as “latch” or “clip”.
Nothing out there? Then this really is one of those parts with no spare, and you’re in the right place. Keep going.
What do you need before you start?
You need the broken part, digital calipers, a ChatGPT account, OpenSCAD, a slicer and access to a 3D printer. The software is free. No printer yet? Ask your local library or makerspace, because many of them have one.
- OpenSCAD. OpenSCAD is free software for creating solid 3D objects from code, for Linux, Windows and macOS. Its downloads page offers a stable release, a release candidate and nightly builds.
- A slicer. PrusaSlicer calls itself free and open source with no account required. OrcaSlicer also imports STL, OBJ and 3MF files, and Bambu Studio is Bambu Lab’s own slicer. The steps below use PrusaSlicer’s names, so expect small differences elsewhere.
- Calipers. A ruler won’t do. You’re working in tenths of a millimeter.
How do you photograph and measure a broken part?
Take flat, straight-on photos of each face, then measure every dimension that touches another part. The photos tell ChatGPT what the shape is. The numbers tell it how big to make that shape.
What photos does ChatGPT need?
ChatGPT needs a few clear, flat views of the part, and that’s all. A tilted photo makes square corners look like they aren’t.
- Put the part on a plain background in good light.
- Shoot straight down at the top, then the side, then the end.
- Add one angled view so the overall shape is easy to read.
- Keep your calipers or a ruler in the frame as a size hint.
How do you measure a part with digital calipers?
Close the jaws and zero the calipers, then measure with light, steady pressure. Make: magazine’s caliper guide calls zeroing critical, and BYU’s Design Review says only light pressure is generally needed. Each part of the tool has one job:
- Outside jaws: overall length, width and thickness.
- Inside jaws: holes and slots.
- Depth gauge: how deep a hole or recess goes.
- Step gauge: the distance between two levels on the part.
Measure each key dimension three times and write down the middle reading. Then make a short list in millimeters, because this list is what you’ll paste into ChatGPT:
Overall length: 42.0 mm
Overall width: 18.5 mm
Thickness: 3.2 mm
Hole diameter: 4.1 mm
Hole center, from the left edge: 8.0 mm
Hook depth: 5.6 mm
What if the part snapped and a piece is missing?
If a piece is missing, measure the part it connects to instead. The slot, peg or hole on the machine tells you what the broken part has to fit. Tape the broken pieces together if you still have them, and measure across the join. Then tell ChatGPT which numbers came from the old part and which came from the machine, so it knows where the real limits are.
What prompt gets a usable model from ChatGPT?
The best prompt gives ChatGPT your photos, your numbers and a clear output: one OpenSCAD script with the measurements as named values at the top. Ask it to question you about anything missing, because a guessed dimension is the most common way to waste a print.
I need to replace a broken plastic latch from a vacuum. The photos show it
from the top, side and end. My caliper measurements are below, in mm.

[paste your list]

Write one complete OpenSCAD script for this part.
- Put every measurement in a named variable at the top, with a comment.
- Add a variable called clearance, set to 0.2, for holes and slots.
- Use millimeters. Keep the part in one solid piece.
- Don't guess. If a dimension is missing, ask me before you write the script.
- When you finish, list every dimension you assumed from the photo alone.
You should get back a script shaped something like this small spacer. We haven’t run this one, so treat it as a picture of the layout rather than a finished model:
// Measurements in mm
outer_diameter = 12.0;   // measured
height = 8.0;            // measured
hole_diameter = 4.1;     // measured
clearance = 0.2;         // adjust after the test print

difference() {
  cylinder(d = outer_diameter, h = height, $fn = 96);
  translate([0, 0, -1])
    cylinder(d = hole_diameter + clearance, h = height + 2, $fn = 96);
}
Why ask ChatGPT for OpenSCAD instead of an STL?
OpenSCAD is a good match for ChatGPT because the model is plain text. ChatGPT can write it in any chat, and you can read it, change one number and rebuild the part. An STL is a finished mesh, which makes a 0.2 mm change much harder. OpenSCAD calls itself The Programmers Solid 3D CAD Modeller
, and its cheat sheet is a single page. You don’t need to learn all of it to change a number.
Can ChatGPT Work or Codex make the STL for you?
ChatGPT Work and Codex can create files on your computer, so they can try the export step for you, though OpenAI’s docs don’t list STL as an output. OpenAI says ChatGPT Work can create finished files
, and its file page says Codex CLI can create and edit files in the working directory. OpenSCAD can also export without its window, using a command from the OpenSCAD manual:
openscad -o part.stl part.scadInstall OpenSCAD yourself first. OpenAI’s security page says Codex runs with network access turned off by default, in a sandbox that typically limits it to your workspace, with an approval policy for when it must stop and ask you. Work in a new folder, approve each command, and ask where it saved the file and how it checked the result. OpenAI’s pricing page lists Codex on Free and Go, subject to rollout, so check what your plan shows.
Can ChatGPT handle threads and curved shapes?
ChatGPT can try, though threads and soft curves are harder than flat parts with holes. For threads, ask it to use a library. OpenSCAD’s libraries page lists BOSL2 and a threads.scad module. For a smooth, sculpted shape, OpenSCAD can be the wrong tool, since it builds objects from code. FreeCAD is an open-source parametric modeler you work with on screen, and ChatGPT can talk you through it one step at a time.
How do you turn the script into an STL in OpenSCAD?
Paste the script into OpenSCAD, preview it, render it, then export it as an STL. The OpenSCAD tutorial covers the same steps:
- Paste the script into the editor and hit preview.
- Compare the shape with your photos. Spin it around and look underneath.
- Click the render icon on the action bar below the viewport.
- Click the export as STL icon on the action bar above the editor, and save the file.
Got an error? Paste the exact message back into ChatGPT and ask for the full script again. OpenSCAD’s export page lists 3MF as well as STL, so you can use either if your slicer takes both.
How do you check the model in a free slicer?
Import the STL into a slicer, measure it there, then lay it flat in its strongest direction. The slicer is your last free check before you spend any plastic, and PrusaSlicer has a tool for each job:
Honestly, I love that the hero of a futuristic AI repair turns out to be a humble pair of calipers. All that computing power, and it still needs you to go measure the thing.
- Size. The Measurement tool sits in the left toolbar and checks model dimensions and angles. Compare a few against your list. A part that’s about 25 times too small or too large usually points to an inches and millimeters mix-up.
- Position. The Place on Face tool opens with the F key. Click a white plane on the model, and that plane lines up with the print bed.
- Just one section. The Cut tool is there for when you only want to print a part of a model. That’s perfect for a test slice.
Which way should a part lie on the print bed?
Lay the part so the pulling force runs along the printed layers, not across them. A filament print pulls apart most easily between its layers, so a hook printed standing up can split right where it’s needed most.
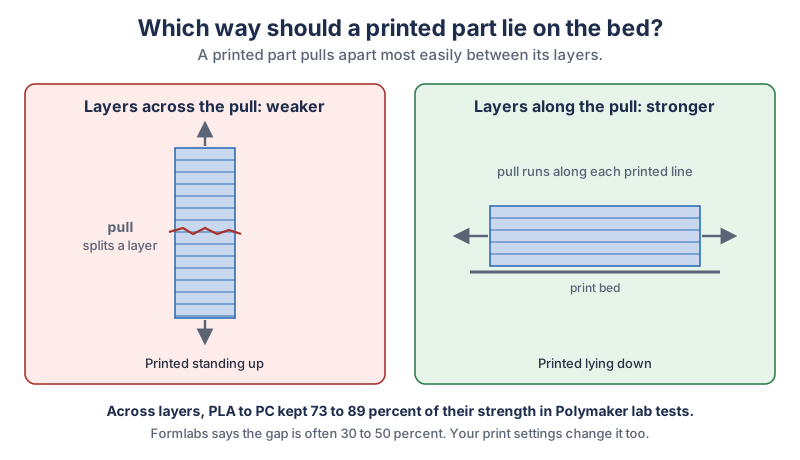
The two sources in that diagram, in plain text:
- Standing up: the layers run across the pull, which is the weaker way.
- Lying down: the layers run along the pull, which is the stronger way.
- Formlabs: its strength guide says the bond between layers is weaker,
often by 30% to 50%
. - Polymaker: its lab numbers show a smaller gap of 11% to 27%, in the materials table further down this page. Your own print settings will change the result.
The same Formlabs guide recommends three to five perimeters for functional filament parts, and says going from two walls to four usually adds more strength than going from 50% to 80% infill. Prusa’s Cut tool page even lists different print orientation as a reason to split a model into pieces.
How do you test-fit a printed part?
Print only the section that has to fit, try it, measure it, and change one number. A test slice takes a fraction of the time of the whole part, and it tells you nearly everything you need to know.
- Print the slice with the critical hole, slot or hook.
- Try it gently on the real machine. Never force it.
- Measure the printed feature with your calipers.
- Change the
clearancevalue and save the script under a new name, such aslatch-v2.scad. - Print the slice again, and repeat until it fits.
Here’s a worked example with made-up numbers. Say a peg measures 6.00 mm and your script’s hole came out at 5.95 mm on the print, with the clearance set to 0.20 mm. You’d like a 0.20 mm gap, so the hole should print at 6.20 mm. That’s 0.25 mm too small, so raise the clearance from 0.20 to 0.45 mm.
Not sure what gap to aim for? Snapmaker’s tolerance guide suggests 0.1 to 0.2 mm for a snug fit and 0.3 to 0.5 mm for parts that slide or turn. Treat those as starting points, because every printer behaves a little differently.
Which 3D printing material is right for a replacement part?
PETG is a sensible default for an everyday replacement part, PLA suits cool indoor parts and quick test fits, and ASA suits parts that live in the sun. We pulled the numbers below from one maker’s data sheets, so the plastics compare fairly, then worked out how much strength each one keeps across its layers.
| Plastic | Heat deflection at 0.45 MPa | Heat deflection at 1.8 MPa | Strength along layers (X-Y) | Strength across layers (Z) | Kept across layers | Good fit |
|---|---|---|---|---|---|---|
| PLA | 60 °C | 58 °C | 52.3 MPa | 40.5 MPa | 77% | Test fits, cool indoor parts |
| PETG | 78 °C | 75 °C | 50.8 MPa | 42.8 MPa | 84% | Everyday mechanical parts, indoors and out |
| ABS | 100 °C | 98 °C | 33.4 MPa | 29.7 MPa | 89% | Stressed parts, away from sunlight |
| ASA | 103 °C | 100 °C | 43.8 MPa | 32 MPa | 73% | Outdoor parts in sun and heat |
| PC | 111 °C | 107 °C | 69.1 MPa | 52.8 MPa | 76% | Hot, hard-working parts |
Our calculation is simple: strength across layers divided by strength along layers. The data sheets are PolyLite PLA, PETG, ABS, ASA and PC. Prusa’s pages back up the last column: PETG for mechanical parts indoors and outdoors, ABS for stressed parts but lacking UV resistance, and ASA for outdoor use. Prusa’s PLA page lists low UV and temperature resistance.
The same name doesn’t mean the same plastic, so check the sheet for the spool you actually buy. Bambu PLA Basic’s data sheet lists 57 °C at 0.45 MPa, with 39 MPa along layers and 35 MPa across, which works out to 90% kept. A copy of the Prusament PETG data sheet lists 74 °C at 0.45 MPa and 68 °C at 1.80 MPa.
ABS, ASA and PC also ask more of your setup. Prusa’s material guides list an enclosure as necessary for large ASA parts, required for ABS and recommended for PC, and they warn that ABS and ASA give off potentially dangerous styrene fumes, so print them in a well-ventilated room.
Which plastic survives a hot car?
PLA is the wrong pick for a car, and even PETG is close to the limit on a dashboard. In a study by Arizona State University and UC San Diego, cars parked in the sun on days in the 100s °F in Tempe, Arizona reached an average of 157 °F on the dashboard after one hour. That’s about 69 °C, which is hotter than the PLA figures in the table.
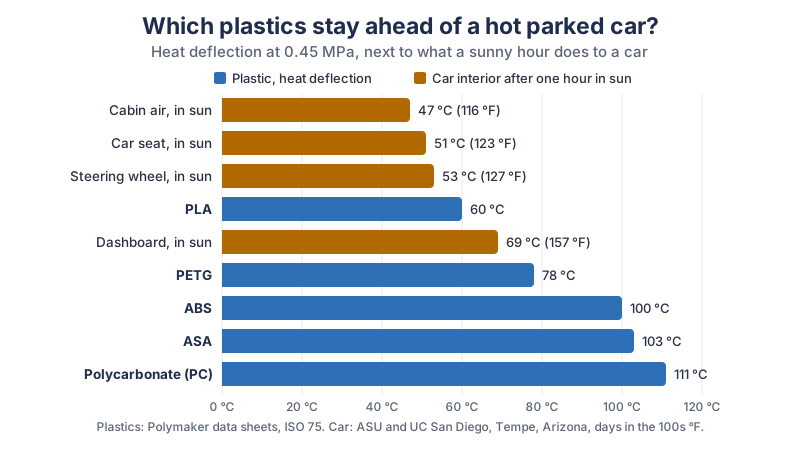
The same numbers in plain text:
| Item | Temperature |
|---|---|
| Cabin air, in sun | 47 °C (116 °F) |
| Car seat, in sun | 51 °C (123 °F) |
| Steering wheel, in sun | 53 °C (127 °F) |
| PLA | 60 °C |
| Dashboard, in sun | 69 °C (157 °F) |
| PETG | 78 °C |
| ABS | 100 °C |
| ASA | 103 °C |
| Polycarbonate (PC) | 111 °C |
One honest note: heat deflection is a lab test on a standard bar under a set load, not a promise about your part. Leave a healthy margin, especially for anything that carries a load. A cup holder clip is a fine car project. Anything on the safety list below isn’t.
What should you use for a rubbery gasket or bumper?
Use a flexible filament such as TPU for soft bumpers and seals. Prusa describes flexible materials as tough and resistant to wear, but recommends them only for experienced makers because they’re harder to print. Get a rigid replacement working first, then try TPU for your next project.
Is a resin printer better for a replacement part?
A resin printer is better for small, detailed parts, and it comes with extra cleanup. Formlabs, which sells resin printers, says its SLA parts have uniform strength in every direction, so print direction matters far less. Resin prints do need washing and curing, and Formlabs’ finishing guide says to Always let prints fully dry
before post-curing, with at least 30 minutes for parts washed in isopropyl alcohol, in a ventilated space.
Which parts should you never 3D print?
Never print a part if its failure could hurt someone. A latch that snaps is annoying. A brake part that snaps is something else entirely. Even the plastic makers put this on you in their data sheets. Here’s Prusa Polymers, in its Prusament PETG sheet:
Everyone has to consider suitability and possible consequences of printed parts usage.
Bambu Lab’s sheet says users are responsible for the legality, safety, and performance indicators of printing
. So here’s our line in the sand, whatever ChatGPT says about it:
- Vehicle safety parts. That means brakes, steering, suspension and seat belts. Real brake systems have their own federal standard, FMVSS No. 135. Your test print can’t show you how a part behaves in an emergency stop.
- Child car seat parts. Child seats have FMVSS No. 213. The American Academy of Pediatrics says not to use any insert unless it came with the seat or was made by the manufacturer for that specific seat, and to check with the manufacturer about parts.
- Anything that carries gas. Writing about certain older brass gas connectors, the U.S. Consumer Product Safety Commission warns:
Only a qualified professional should check your connector and replace it if needed.
Treat every gas part with that same respect. - Anything touching mains electricity. Plugs, switches, fuse holders and heater parts need listed parts and, where needed, a licensed electrician.
- Things that hold people up or protect them. That means ladder parts, climbing gear, helmets and anything hanging over someone’s head.
What gear is worth buying for replacement parts?
Good calipers are the first thing worth buying, and the printer comes second, because bad numbers ruin a good printer’s work. If you repair things often and want the best tools, these are the ones to look at:
- Top-tier calipers. The Mitutoyo 500-196-30 is a 150 mm digital caliper with 0.01 mm resolution, per this listing. Browse Mitutoyo digital calipers on Amazon. You’ll spot the plain stainless digital calipers too, and those will do for a first project.
- An enclosed printer for tougher plastics. The Prusa CORE One+ is Prusa’s fully enclosed line, which helps with ABS and ASA. Browse enclosed 3D printers on Amazon.
- A multi-color printer. Bambu Lab’s H2D is a dual-nozzle printer that works with the AMS 2 Pro filament system. Two nozzles are handy when a part needs a separate support material or a color match. Browse multi-color 3D printers on Amazon.
- A resin printer for tiny parts. Formlabs’ Form 4 is sold as a professional resin printer, and the Elegoo Saturn 4 Ultra 16K is a resin printer many hobbyists will know. Browse high-resolution resin 3D printers on Amazon.
- A curing station. Formlabs’ Form Cure V2 combines heat and 405 nm light, and Elegoo’s Mercury Plus V3.0 washes and cures in one unit. Browse wash and cure stations on Amazon.
- The right plastic. Keep a spool of PETG filament around for repairs, and add ASA filament for anything that lives outdoors.
What should you try first?
Start with a small, boring part that nobody will miss if it fails: a shelf peg, a knob or a cable clip. Measure it, ask ChatGPT for the script, and take it all the way through to a test print. You’ll learn the whole loop in one sitting, and nothing you care about is on the line. Once that feels easy, go rescue the thing that’s really broken. We add new ChatGPT tutorials regularly, and the newsletter box below is the easiest way to catch them.
Go rescue something small this weekend. There’s a special kind of joy in snapping a part into place that didn’t exist this morning, and your junk drawer may finally start to feel nervous.
Sources and further reading
- Image inputs (OpenAI) — attaching images, checked Nov 6, 2026
- Work with files (OpenAI) — file types ChatGPT creates, Codex CLI file edits
- Image generation (OpenAI) — what image generation does
- Get started with ChatGPT Work (OpenAI) — what Work can do
- Agent approvals and security (OpenAI) — sandbox, network off by default, approvals
- Models (OpenAI) — Astra, Sol and Luna
- Pricing and plans (OpenAI) — Codex on Free and Go; plan list only
- GPT-6 and Intelligent UI for everyone (OpenAI) — which plans get which GPT-6 model, read as a search excerpt
- Uploading files and audio to ChatGPT (OpenAI Help) — image and upload limits, read as a search excerpt
- Data controls in ChatGPT (OpenAI Help) — turning off model training, read as a search excerpt
- STL file creation for 3D printing (OpenAI Community) — a user report from July 2026, not official guidance
- OpenSCAD — what it is, supported systems, model sites
- OpenSCAD downloads — stable release, release candidate and nightly builds
- OpenSCAD cheat sheet — language overview
- OpenSCAD libraries — BOSL2 and threads.scad
- OpenSCAD Tutorial, Chapter 1 (Wikibooks) — preview, render and STL export
- OpenSCAD User Manual: Export (Wikibooks) — STL and 3MF
- OpenSCAD User Manual: command line (Wikibooks) — the -o option
- FreeCAD — free visual CAD
- PrusaSlicer (Prusa Research) — free, open source, Printables count
- Measurement tool (Prusa Knowledge Base) — checking dimensions
- Place on Face tool (Prusa Knowledge Base) — the F key
- Cut tool (Prusa Knowledge Base) — printing part of a model
- Download OrcaSlicer — supported model files
- Bambu Studio download (Bambu Lab) — Bambu Lab’s slicer; the page refused direct reads
- Filament Material Guide (Prusa Knowledge Base) — enclosure needs by material
- PLA (Prusa Knowledge Base) — UV and temperature limits
- PETG (Prusa Knowledge Base) — indoor and outdoor mechanical parts
- ABS (Prusa Knowledge Base) — stressed parts, enclosure, fumes
- ASA (Prusa Knowledge Base) — outdoor use, enclosure, fumes
- Flexible materials (Prusa Knowledge Base) — TPU
- PolyLite PLA data sheet (Polymaker) — ISO 75 and ISO 527 values
- PolyLite PETG data sheet (Polymaker) — ISO 75 and ISO 527 values
- PolyLite ABS data sheet (Polymaker) — ISO 75 and ISO 527 values
- PolyLite ASA data sheet (Polymaker) — ISO 75 and ISO 527 values
- PolyLite PC data sheet (Polymaker) — ISO 75 and ISO 527 values
- Bambu PLA Basic data sheet (Bambu Lab) — values and disclaimer
- Prusament PETG data sheet (Prusa Polymers) — version 1.0, Aug 17, 2023, reseller copy; values and disclaimer
- Strongest 3D printing materials (Formlabs) — layer strength, walls, infill; a resin printer maker’s view
- SLA basic finishing (Formlabs) — washing, drying and curing
- Safety with Form Wash L (Formlabs) — resin and solvent handling
- Study: Hot cars can hit deadly temperatures in as little as one hour (ASU News) — car interior temperatures
- 3D printing tolerances explained (Snapmaker) — suggested gaps
- How to use your digital calipers (Make:) — zeroing and caliper parts
- Getting the most out of digital calipers (BYU Design Review) — measuring pressure and technique
- 49 CFR 571.135, Light vehicle brake systems (eCFR) — FMVSS No. 135
- 49 CFR 571.213, Child restraint systems (eCFR) — FMVSS No. 213
- Car safety seats: information for families (American Academy of Pediatrics) — inserts and parts
- Certain Older Gas Connectors May Be Dangerous (U.S. CPSC) — qualified professionals only
- Mitutoyo 500-196-30 listing (Penn Tool Co) — range and resolution
- Prusa CORE One+ (Prusa Research) — enclosed printer line
- Bambu Lab H2D (Bambu Lab) — dual nozzle printer, read as a search excerpt
- Form 4 (Formlabs) — resin printer
- Form Cure V2 (Formlabs) — heat and 405 nm light
- Saturn 4 Ultra 16K bundle (Elegoo) — read as a search excerpt
- Mercury Plus V3.0 (Elegoo) — wash and cure, read as a search excerpt
Questions and answers
Can ChatGPT create STL files?
Sometimes, but OpenAI’s documentation doesn’t list STL as a file type it makes, as of November 6, 2026. The steadier route is to ask ChatGPT for an OpenSCAD script, then export the STL from OpenSCAD yourself. One user on OpenAI’s forum reports that STL files from a chat can take several tries.
Can ChatGPT turn a picture into a 3D model?
ChatGPT can read a picture and write code for a model, but a picture alone can’t give it true sizes. Give it caliper measurements in millimeters along with the photos. OpenAI’s own image docs say not to rely on the image alone to communicate the task.
Do you need CAD skills to make a replacement part?
You don’t need CAD skills to start, because ChatGPT can write the OpenSCAD script for simple shapes. You do need to measure carefully, read a few named numbers and change them after a test print. Sculpted, curved parts are harder and may need a visual CAD tool such as FreeCAD.
What is the best filament for replacement parts?
PETG is a good default for everyday replacement parts. Polymaker’s data sheets list PolyLite PETG at 78 °C heat deflection at 0.45 MPa, compared with 60 °C for PolyLite PLA. For parts in sun and heat, ASA is the better pick at 103 °C, and it needs more care to print.
Can you 3D print car parts?
You can print small interior parts such as clips and trim, as long as you choose a plastic that handles heat. ASU research measured dashboards at an average of 157 °F, about 69 °C, after one hour in the sun, so PLA is a poor fit. Never print brakes, steering, suspension or seat belt parts.